

As we approach the new year and winter break comes to a close, there is an opportunity for new beginnings and fresh looks. It’s time to think outside the big box store and turn heads on campus this winter & spring with some custom one-of-a-kind fits and accessories.
Clothbound Notebooks
Nothing says “back to school” like fishing out old notebooks from the previous semester, but even if the content that fills their pages might be boring, their covers shouldn’t have to match the dullness. This project opens up endless possibilities for creativity and takes just a few supplies.
Start off with a notebook, fabric with a fun design of your choosing, fabric glue, scissors, ruler, and optional popsicle stick. Find the frayed end of the fabric and line it up with the spiraled side of the notebook. Cut around the edge of the cloth, leaving about two inches on each side. Run the glue all over the cover and press the fabric firmly against it – using the popsicle stick to smooth out any air pockets.
Flip the notebook open and cut again along the sides of the cloth, leaving an inch of space. Snip diagonally on the corners to allow for a clean fold. Apply the glue to the edge of the notebook and wrap the excess cloth over it – pressing down to secure it. Repeat the process on the other side. Once the fabric is securely bound to the book, go ahead and cut out an insert using card stock to glue over the rough edges of the binding.
Polaroid Laptop Cover

It is more common these days to find students in the library with a laptop instead of a book. These devices have become one of the most useful tools for school, but unlike other back to school tools, laptops can look as cute as the person using it. This project is essentially a polaroid collage, but you can choose any type of imagery. All you’ll need is a bunch of polaroid pictures, painter’s tape, and a clear laptop cover.
Gather all the photos you have collected over the years and add a piece of painter’s tape to the back. Place them on the front of the laptop in whatever orientation you desire until the entire space is filled with personal images. Once you are happy with the result, encase the collage with the clear laptop cover. In minutes, you have created a unique and personalized design.
Custom Hoodie
What better way to take on the new semester than by sporting some fresh DIY clothes? A quick and easy athleisure piece is a custom hoodie upcycled from a thrift store. Take your pick from the many options available at your local secondhand shop, but preferably one that is a solid neutral color. To give a contemporary edge, choose one that is somewhat oversized, then crop it to your preferred length.
Find an iron-on patch graphic that fits your style. This piece is your project, so make it your own, but simplicity does go a long way. Small graphics like a smiley face or butterfly keep the design minimal and trendy. Position the image wherever you want on the hoodie, and when you are satisfied, cover the patch with a cloth before ironing it onto the shirt. Reinforce the patch sew around the edge with a needle and thread.
Scrunchies
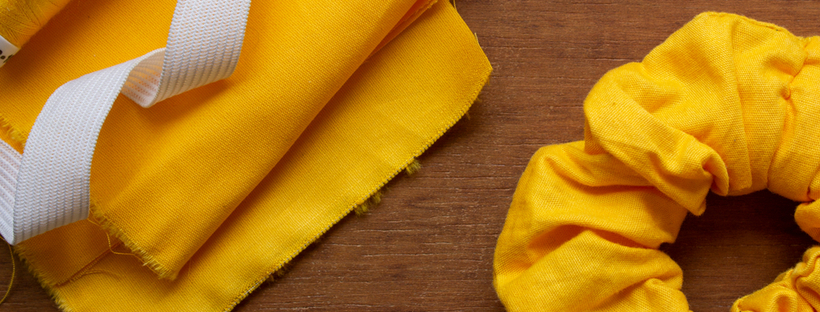
It is no secret that the 90s are back, and with it, the popular scrunchy. This project takes a little bit more effort than the others on our list, but it’ll be worth it when you have more scrunchies than you’ll know what to do with. Only a few supplies are needed: the fabric of your choosing, scissors, half-inch elastic, safety pins, needle, and matching thread.
Measure out the size of the elastic by wrapping it around your wrist and leaving a little bit of extra space before cutting it. Cut the fabric about four inches wide by twenty-one inches long, then fold it in half with the side you want to be shown on the inside. Sew the strip shut but leave an inch on either side open. Flip the tube inside-out by using a safety pin attached to one side to guide it through the inside.
Once right-side-out, sew the ends shut while leaving a slit open. While keeping hold of one side of the elastic, attach a safety pin to the other side and thread it through the hole until it reaches the other end. Sew the ends together and close the slit in the fabric. Voila! You have a new scrunchy for the new semester.


No Comments